命令执行深入研究
渗透测试
在学习 Web 安全的过程中,接触了许多门语言,接触了他们很多可以用来执行命令的函数,在翻看 Java ProcessImpl 没有头绪的时候,突发奇想对这些不同语言的命令执行的函数进行一个更加深入的研究。
命令执行深入研究 -------- ### 前言 在学习 Web 安全的过程中,接触了许多门语言,接触了他们很多可以用来执行命令的函数,在翻看 Java ProcessImpl 没有头绪的时候,突发奇想对这些不同语言的命令执行的函数进行一个更加深入的研究。 ### 系统是如何实现的执行命令 #### Linux 和 windows 操作系统不同,linux 系统作为 20 世纪 90 年代诞生的类 unix 操作系统,他和 unix 系统的相似程度更高,他几乎完全继承了标准 unix 系统的 sh(**Bourne shell**),并发扬光大。比如 bash,它的全称是 Bourne again shell,又或者是 dash 它其实就是 Bourne shell 的精简版,是作为Debian Linux发行版的一部分开发的,还有 zsh 是近几年来比较火爆的一种 shell,对 Bourne shell 作出了很大的改进,也是目前 macOS 的默认 Shell 。 以我们现在常见的 Linux 操作系统 Ubuntu 为例,我们可以看到它里面包含了两种 shell,一种是 /bin/bash 一种是 /bin/dash,其中 /bin/sh 以软连接的方式指向了 /bin/dash,同时默认的用户操作时的 shell 仍为 /bin/bash 。 在 shell 执行命令的时候,存在两种 command ,shell built-in command 和 非 shell built-in command,也就是是否为 Linux Shell 的内置命令,如果是 Linux Shell 的内建命令的话 shell 会自己解释执行,而无需 fork 一个 `child process` 子进程来执行该 `command` 指令;相应的,对于,非 `built-in command` 指令类型,shell会从环境变量中按顺序搜索该 `command` 指令,如果能查到则会 fork 一个 `child process` 子进程来调用 exec 执行该 `command` 指令,执行完毕后等待 bash shell 父进程调用 wait 进行回收。 我们可以使用 type 命令来查看 命令 是否为 `built-in command` ,which(在ubuntu下只显示外部命令)、whereis、where 等命令也可以完成类似工作,不过要注意 在 Linux 系统下,有些命令虽然为内建命令,但是系统关键目录也存在其可执行文件  `enable` 或 `help` 命令可以查看当前终端所有的 `built-in command` 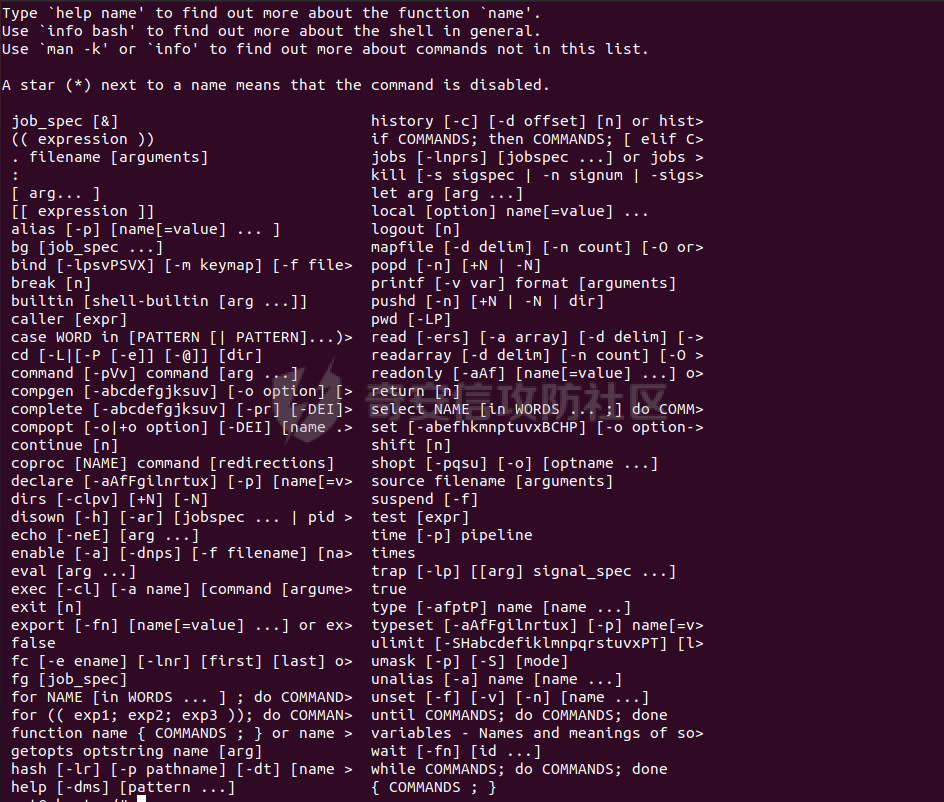 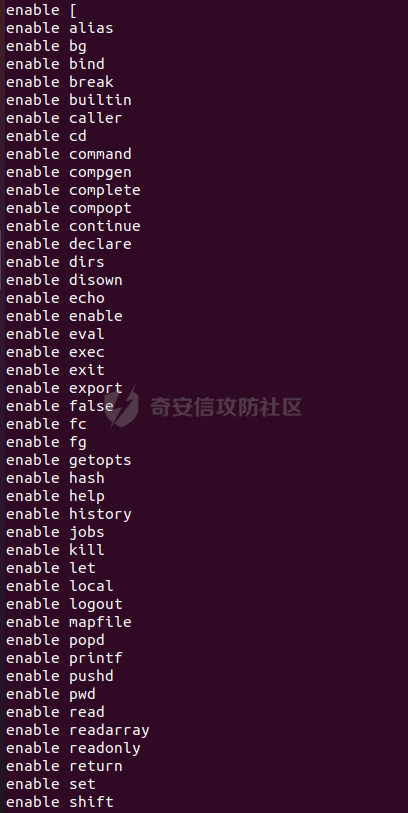 我们可以通过 `bpftrace -e 'tracepoint:sys_enter_execve { join(args->argv); }'` 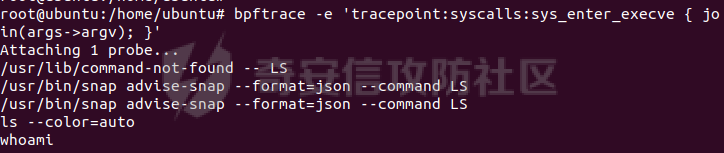 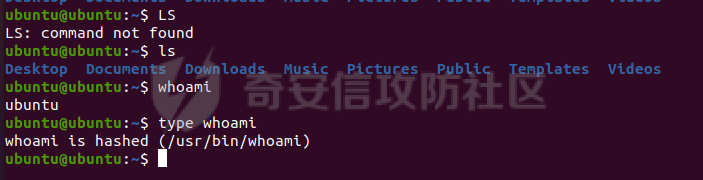 #### windows windows 操作系统也从 unix 中吸取了大量经验,他的 shell 也是单独的编译好的二进制程序,主要就是 cmd.exe,powershell.exe,在 Windows 终端里不存在 enable 这种命令,不过可以借助 `where` 或 `set PATH` 指令进行指令判断。 从系统环境变量`PATH`里面定位查询(有时候会受到人为增添的环境变量的影响),如果能查到一般来说可以判定为外部调用指令(排除非系统特殊目录),否则为内置命令 或者 命令确实不存在。 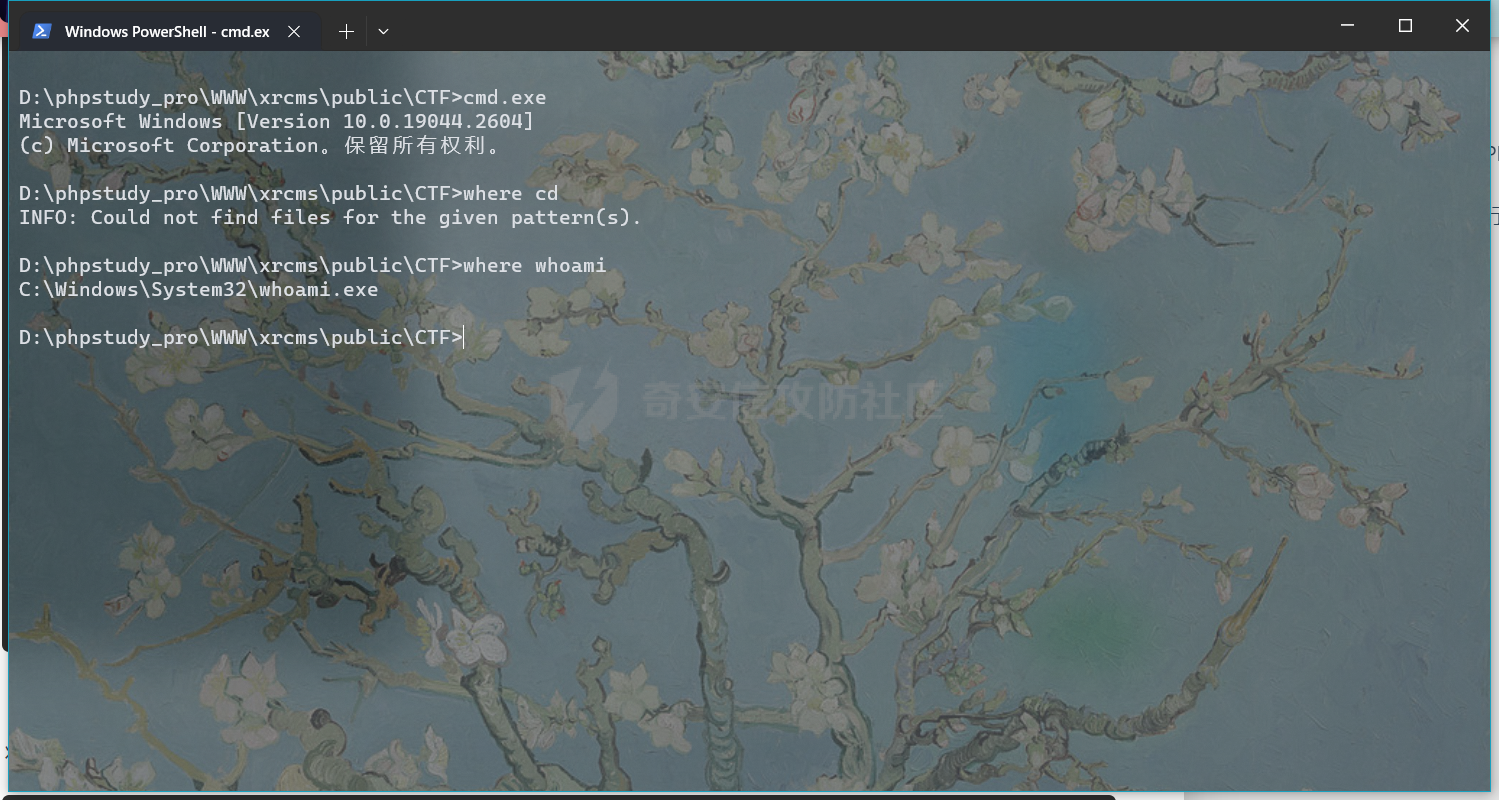 ### 不同语言是如何执行命令的 #### PHP 首先搞一套源码 <https://github.com/php/php-src>,可以利用 grep 命令查找相应 c 源码文件的位置  或者扔进编辑器里直接搜 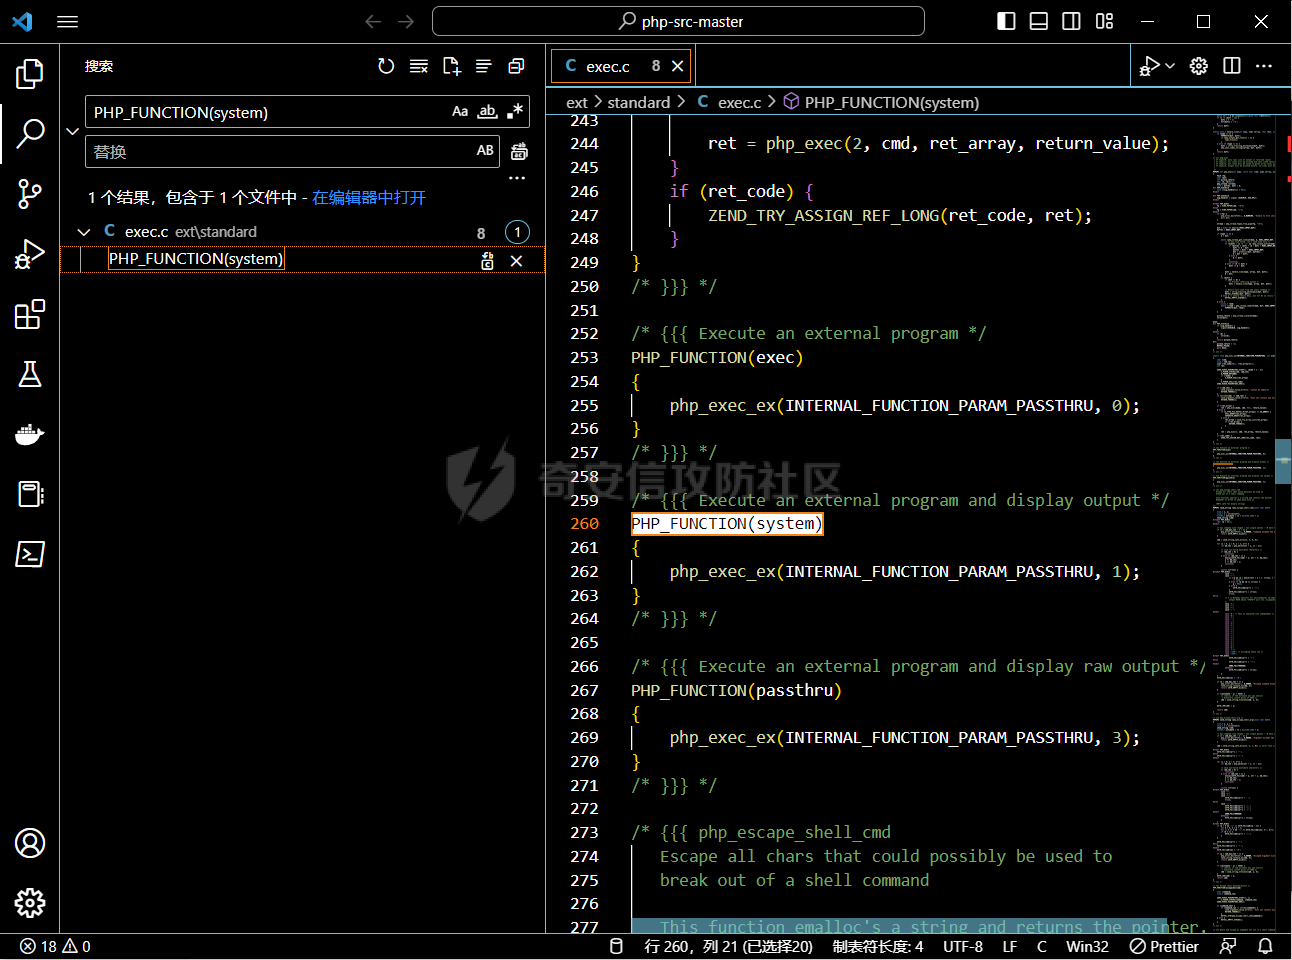 在 C 源码里跟进一下看看到底如何执行的 ```php static void php\_exec\_ex(INTERNAL\_FUNCTION\_PARAMETERS, int mode) /\* {{{ \*/ { char \*cmd; size\_t cmd\_len; zval \*ret\_code\=NULL, \*ret\_array\=NULL; int ret; ZEND\_PARSE\_PARAMETERS\_START(1, (mode ? 2 : 3)) Z\_PARAM\_STRING(cmd, cmd\_len) Z\_PARAM\_OPTIONAL if (!mode) { Z\_PARAM\_ZVAL(ret\_array) } Z\_PARAM\_ZVAL(ret\_code) ZEND\_PARSE\_PARAMETERS\_END(); if (!cmd\_len) { zend\_argument\_value\_error(1, "cannot be empty"); RETURN\_THROWS(); } if (strlen(cmd) != cmd\_len) { zend\_argument\_value\_error(1, "must not contain any null bytes"); RETURN\_THROWS(); } if (!ret\_array) { ret \= php\_exec(mode, cmd, NULL, return\_value); } else { if (Z\_TYPE\_P(Z\_REFVAL\_P(ret\_array)) \== IS\_ARRAY) { ZVAL\_DEREF(ret\_array); SEPARATE\_ARRAY(ret\_array); } else { ret\_array \= zend\_try\_array\_init(ret\_array); if (!ret\_array) { RETURN\_THROWS(); } } ret \= php\_exec(2, cmd, ret\_array, return\_value); } if (ret\_code) { ZEND\_TRY\_ASSIGN\_REF\_LONG(ret\_code, ret); } } ``` 继续跟进 ```php /\* {{{ php\_exec \* If type==0, only last line of output is returned (exec) \* If type==1, all lines will be printed and last lined returned (system) \* If type==2, all lines will be saved to given array (exec with &$array) \* If type==3, output will be printed binary, no lines will be saved or returned (passthru) \* \*/ PHPAPI int php\_exec(int type, const char \*cmd, zval \*array, zval \*return\_value) { FILE \*fp; char \*buf; int pclose\_return; char \*b, \*d\=NULL; php\_stream \*stream; size\_t buflen, bufl \= 0; #if PHP\_SIGCHILD void (\*sig\_handler)() \= NULL; #endif #if PHP\_SIGCHILD sig\_handler \= signal (SIGCHLD, SIG\_DFL); #endif #ifdef PHP\_WIN32 fp \= VCWD\_POPEN(cmd, "rb"); #else fp \= VCWD\_POPEN(cmd, "r"); #endif if (!fp) { php\_error\_docref(NULL, E\_WARNING, "Unable to fork \[%s\]", cmd); goto err; } stream \= php\_stream\_fopen\_from\_pipe(fp, "rb"); buf \= (char \*) emalloc(EXEC\_INPUT\_BUF); buflen \= EXEC\_INPUT\_BUF; if (type != 3) { b \= buf; while (php\_stream\_get\_line(stream, b, EXEC\_INPUT\_BUF, &bufl)) { /\* no new line found, let's read some more \*/ if (b\[bufl \- 1\] != '\\n' && !php\_stream\_eof(stream)) { if (buflen < (bufl + (b \- buf) + EXEC\_INPUT\_BUF)) { bufl += b \- buf; buflen \= bufl + EXEC\_INPUT\_BUF; buf \= erealloc(buf, buflen); b \= buf + bufl; } else { b += bufl; } continue; } else if (b != buf) { bufl += b \- buf; } bufl \= handle\_line(type, array, buf, bufl); b \= buf; } if (bufl) { if (buf != b) { /\* Process remaining output \*/ bufl \= handle\_line(type, array, buf, bufl); } /\* Return last line from the shell command \*/ bufl \= strip\_trailing\_whitespace(buf, bufl); RETVAL\_STRINGL(buf, bufl); } else { /\* should return NULL, but for BC we return "" \*/ RETVAL\_EMPTY\_STRING(); } } else { ssize\_t read; while ((read \= php\_stream\_read(stream, buf, EXEC\_INPUT\_BUF)) \> 0) { PHPWRITE(buf, read); } } pclose\_return \= php\_stream\_close(stream); efree(buf); done: #if PHP\_SIGCHILD if (sig\_handler) { signal(SIGCHLD, sig\_handler); } #endif if (d) { efree(d); } return pclose\_return; err: pclose\_return \= \-1; RETVAL\_FALSE; goto done; } /\* }}} \*/ ``` 可以看到 VCWD\_POPEN ,跟进至 virtual\_popen,继续跟进到 popen\_ex,可以看到,最后实际上就是进行了一系列的线程操作,最终调用的实际上就是这里的 CreateProcessW 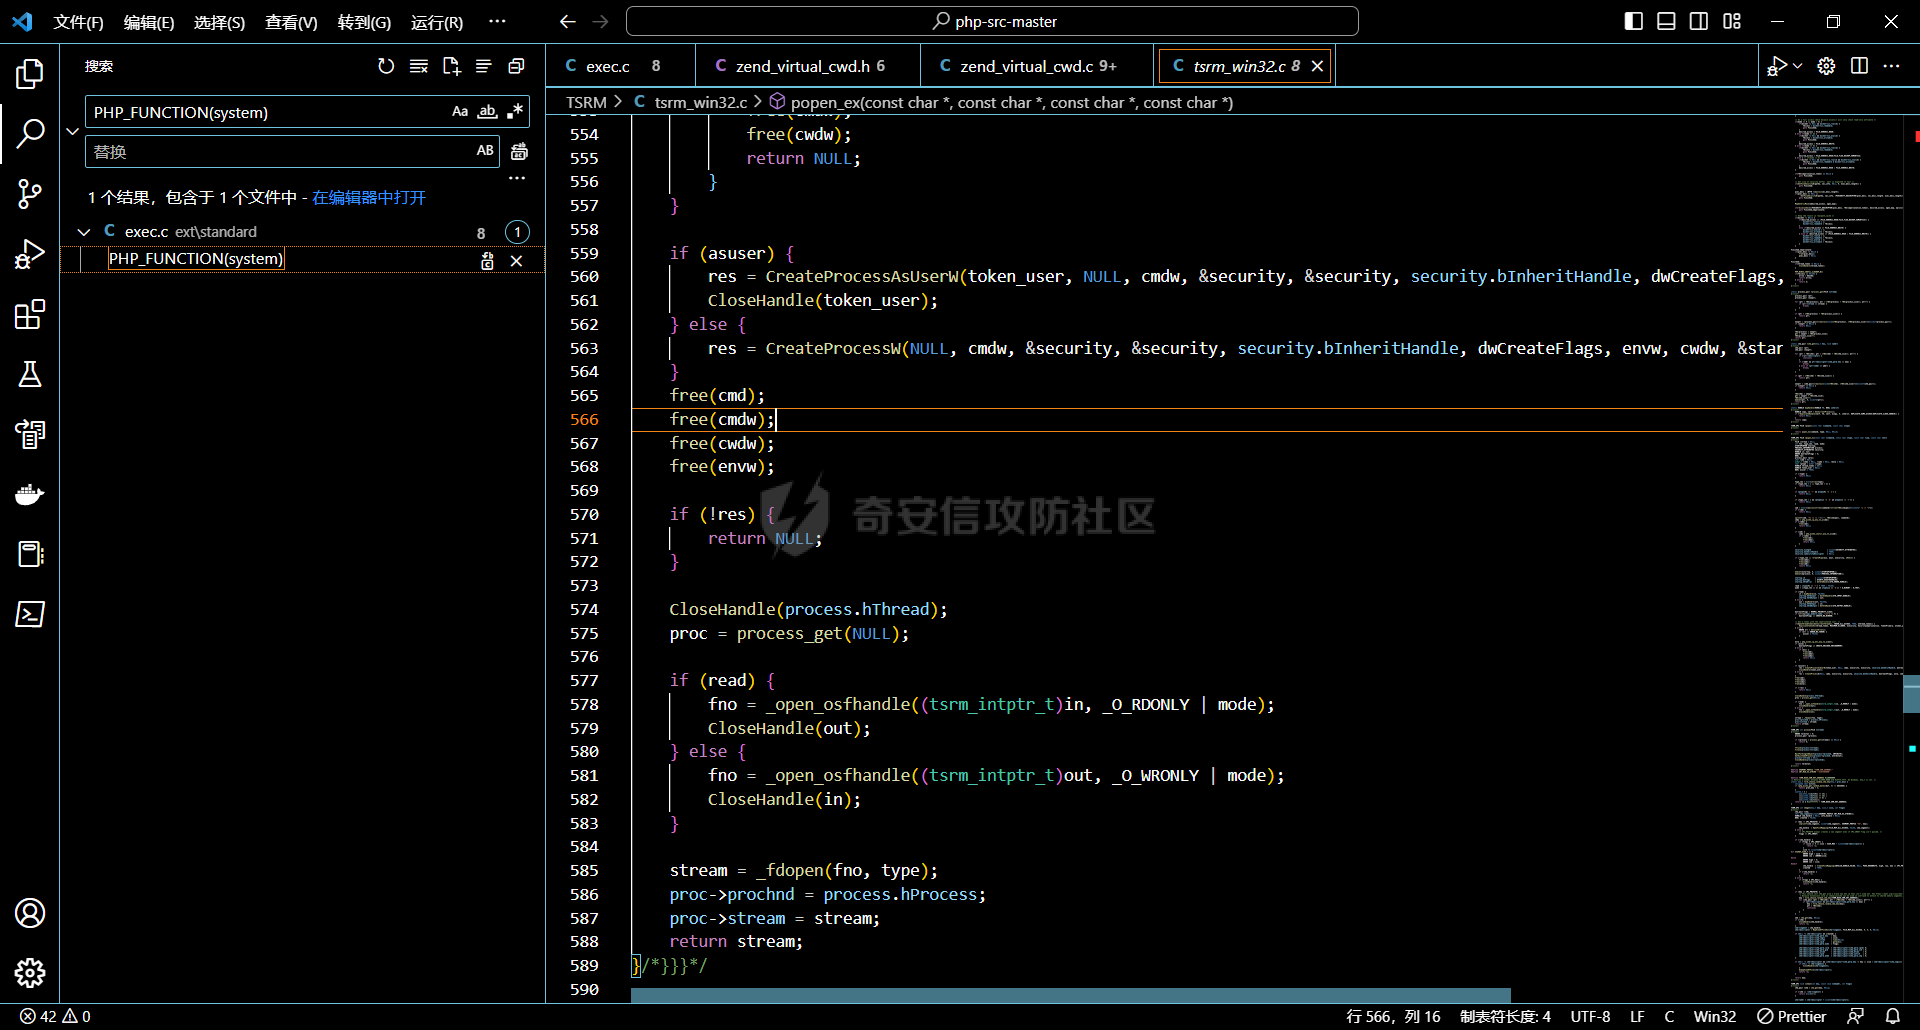 这里根据编译配置的不同会有不同的 VCWD\_POPEN 定义,这个 VCWD\_POPEN 直接就调用执行了系统的 popen,这里的这个 popen 还是 tsrm\_win32 里的 popen ,最终也是回到 popen\_ex 进行一系列的操作最后创建进程 define VCWD\_POPEN(command, type) popen(command, type) ====================================================== 动态调试时的方法栈 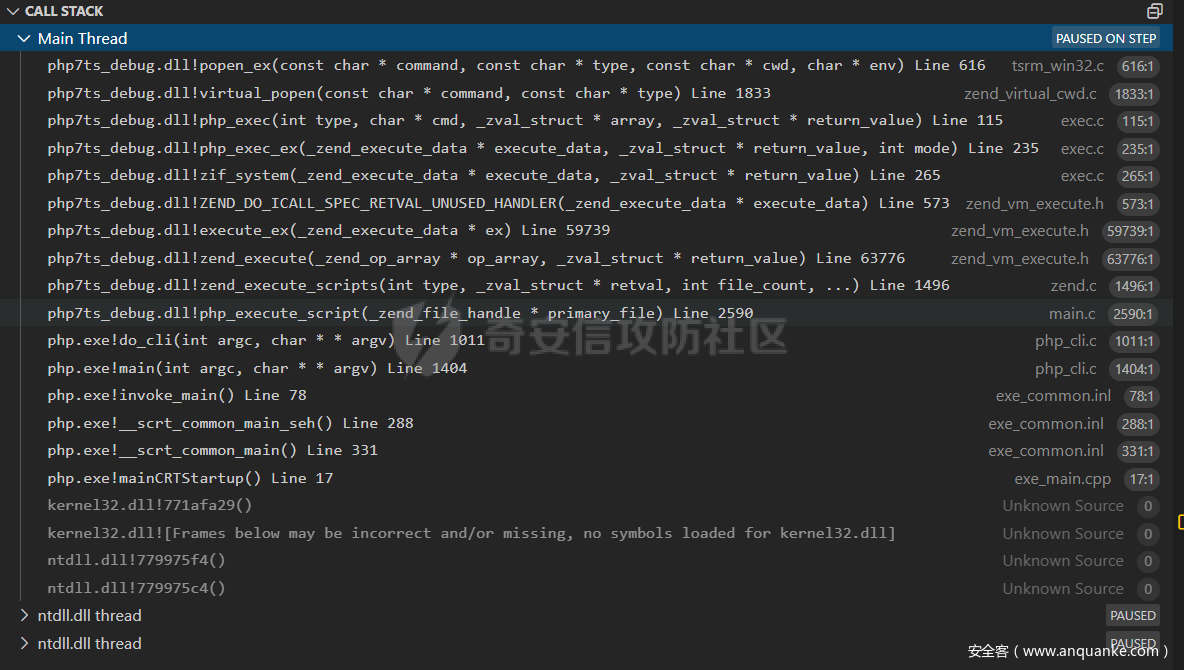 这里可以简单看一下 Qftm 师傅调试的两张图片,这里就进入到 windows 操作系统层面了,我们可以在 windows 文档中找到 [相关部分](https://learn.microsoft.com/zh-cn/windows/win32/procthread/creating-processes),我们在调用 `CreateProcessW` 系统 API 启动相关进程之后,我们在底层调用的是`cmd.exe /c xxx` ,然后通过`cmd`进程来执行相关指令 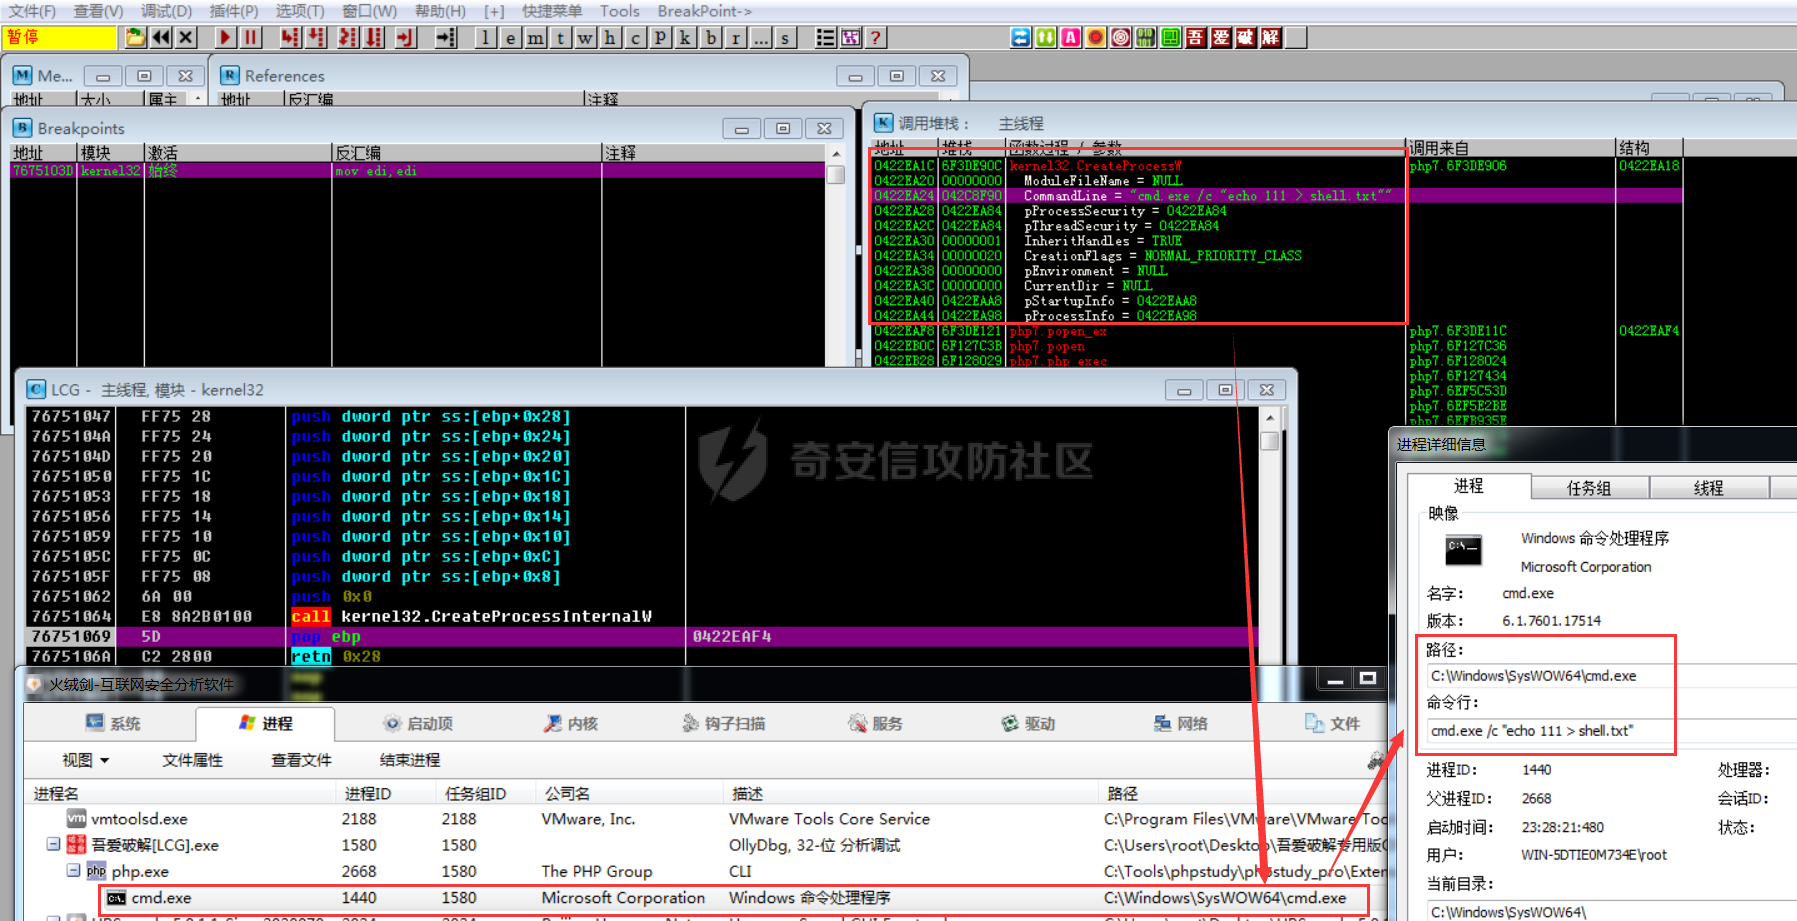 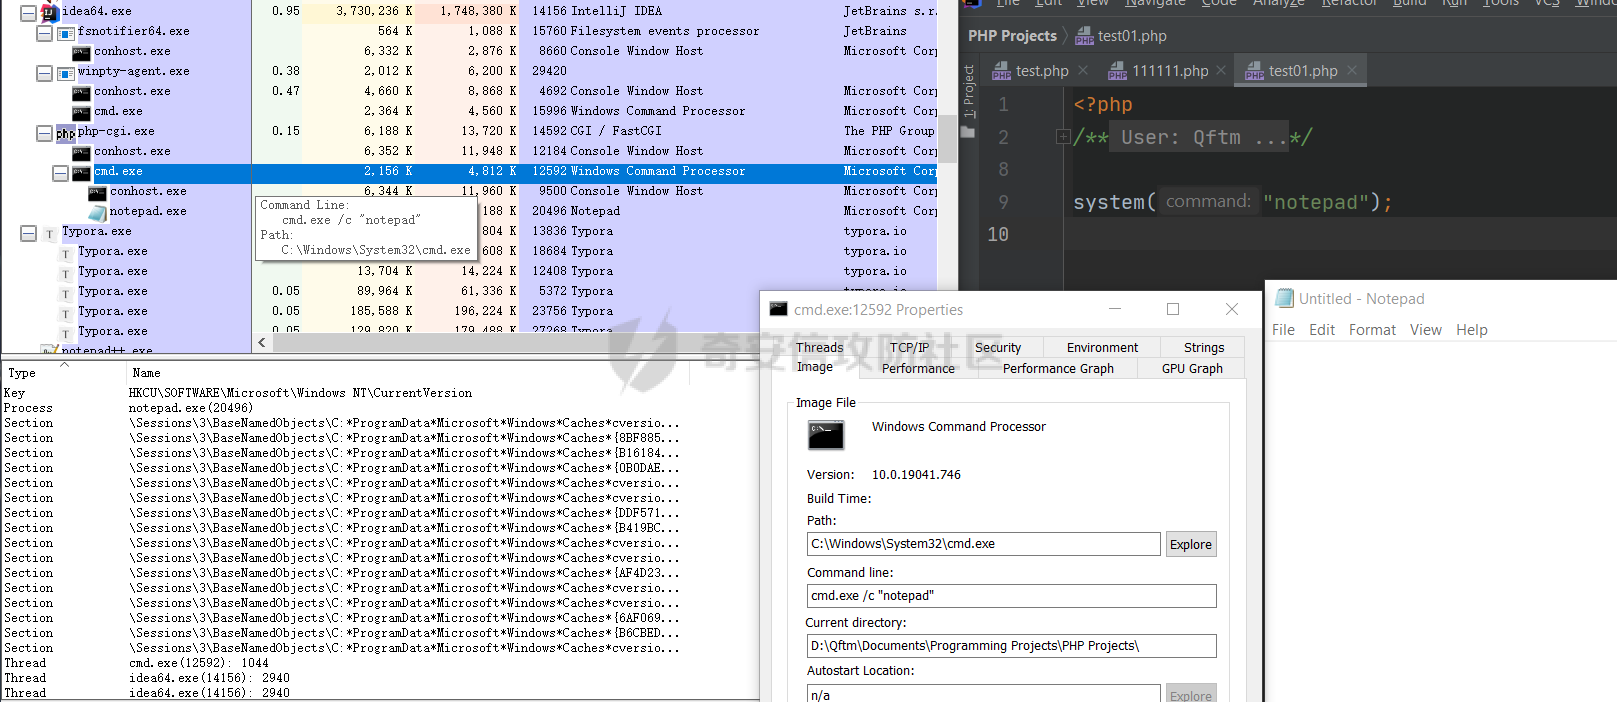 这里查看进程使用的是 windows 的 process-explorer 应用,可以在这里下载 <https://learn.microsoft.com/en-us/sysinternals/downloads/process-explorer> 上面是 Win 系统下的,win 和 linux 的区分点在 virtual\_popen 方法处 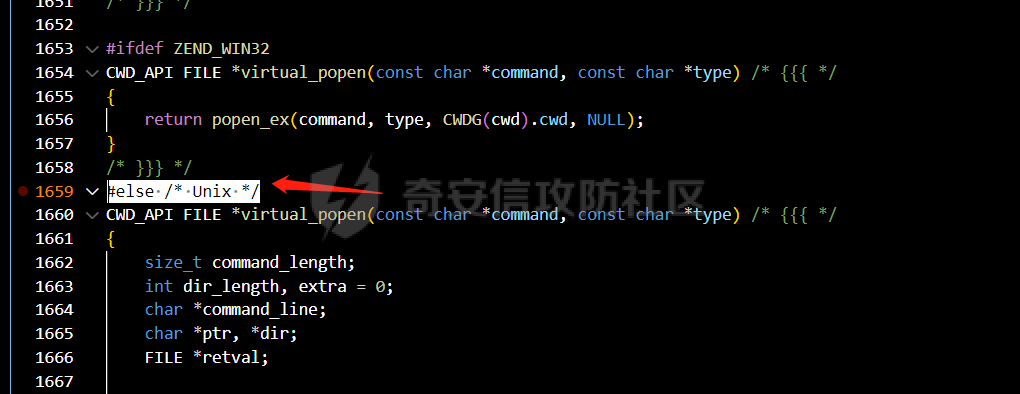 在 Unix 下不会直接进入 popen\_ex 进行线程操作,而是在一系列处理后直接进行 popen 的调用 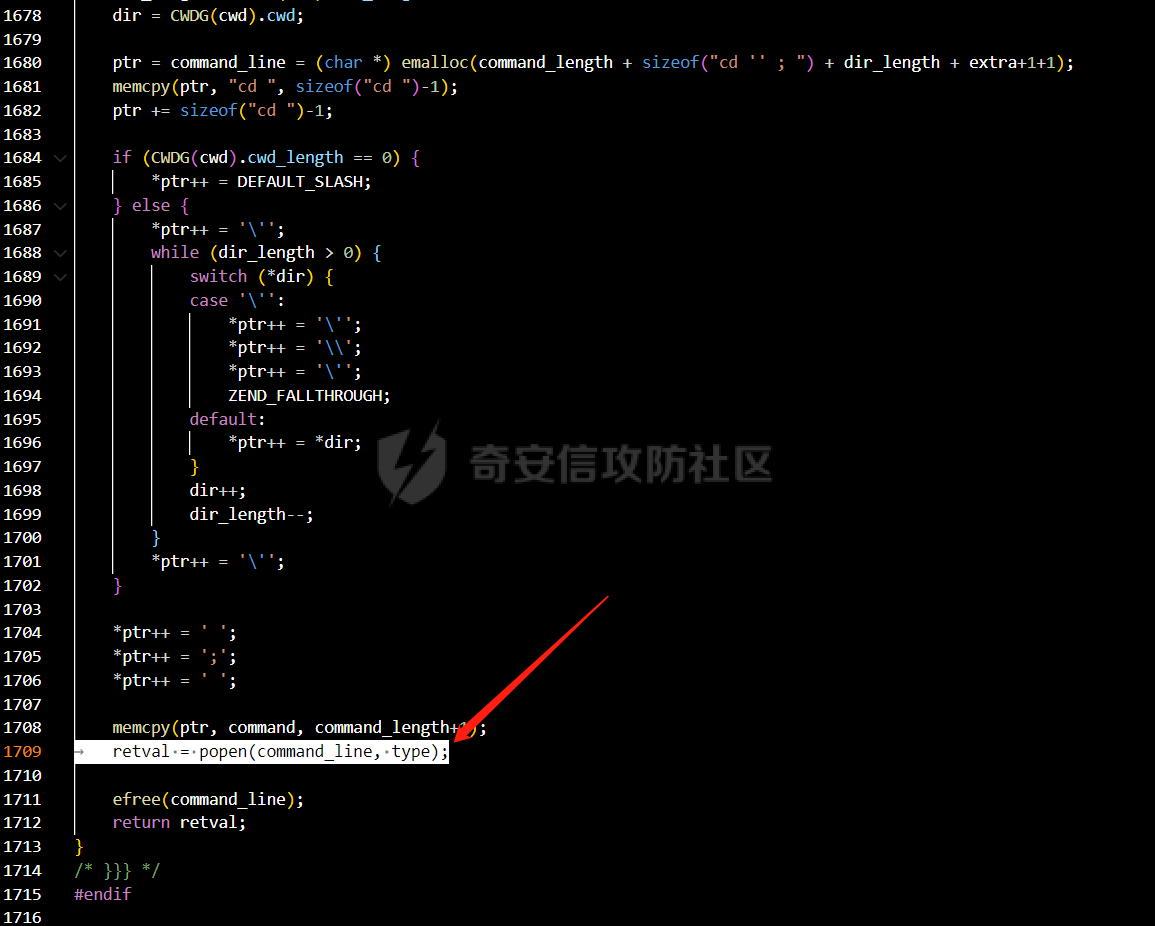 这里的 popen 就不是上面 tsrm\_win32 里的 popen 了,在 linux 系统下,我们这里的 popen 实际上是 linux 系统的 glibc 中写好的。搞到这个源码的方法也挺简单,如果你之间看过 P 牛的环境变量注入的话应该会有一定的印象: - 首先获取包名 <https://command-not-found.com/> - 看到相应的包名之后去查找相应的包 比如 ubuntu 系统下我们就可以去 <https://packages.ubuntu.com/> 查找相应的包 - 下载 orig.tar.xz 后缀的源码包即可 这个包我们可以在这里找到 [http://archive.ubuntu.com/ubuntu/pool/main/g/glibc/glibc\_2.31.orig.tar.xz](http://archive.ubuntu.com/ubuntu/pool/main/g/glibc/glibc_2.31.orig.tar.xz) ```php ┌──(sp4c1ous㉿PC-20210224XFDL)-\[/mnt/d/CTF乱七八糟/glibc-2.31\] └─$ grep \-rn "popen (" . ./conform/data/stdio.h-data:129:function {FILE\*} popen (const char\*, const char\*) ./libio/iolibio.h:70:extern FILE\* \_IO\_popen (const char\*, const char\*) \_\_THROW; ./libio/iolibio.h:71:extern FILE\* \_IO\_new\_popen (const char\*, const char\*) \_\_THROW; ./libio/iolibio.h:72:extern FILE\* \_IO\_old\_popen (const char\*, const char\*) \_\_THROW; ./libio/iopopen.c:220:\_IO\_new\_popen (const char \*command, const char \*mode) ./libio/oldiopopen.c:139:\_IO\_old\_popen (const char \*command, const char \*mode) ./libio/stdio.h:800:extern FILE \*popen (const char \*\_\_command, const char \*\_\_modes) \_\_wur; ./libio/tst-popen1.c:9: FILE \*fp \= popen ("echo hello", "r"); ./libio/tst-popen1.c:27: fp \= popen ("echo hello", "re"); ./nptl/tst-popen1.c:42: f \= popen ("echo something", "r"); ./stdio-common/test-popen.c:62: output \= popen ("/bin/cat >" OBJPFX "tstpopen.tmp", "w"); ./stdio-common/test-popen.c:72: input \= popen ("/bin/cat " OBJPFX "tstpopen.tmp", "r"); ./stdio-common/test-popen.c:86: output \= popen ("/bin/cat", "m"); ./stdio-common/tst-popen.c:26: FILE \*f \= popen ("echo test", "r"); ./stdio-common/tst-popen2.c:24: FILE \*f2 \= popen ("echo test1", "r"); ./stdio-common/tst-popen2.c:30: FILE \*f3 \= popen ("echo test2", "r"); ./stdio-common/tstscanf.c:65: out \= popen ("/bin/cat", "w"); ./stdio-common/tstscanf.c:75: in \= popen (buf, "r"); ┌──(sp4c1ous㉿PC-20210224XFDL)-\[/mnt/d/CTF乱七八糟/glibc-2.31\] └─$ grep \-rn "popen(" . ./libio/iopopen.c:63:/\* POSIX states popen shall ensure that any streams from previous popen() ./libio/iopopen.c:80: /\* If any stream from previous popen() calls has fileno ./libio/oldiopopen.c:104: /\* POSIX.2: "popen() shall ensure that any streams from previous ./libio/oldiopopen.c:105: popen() calls that remain open in the parent process are closed ./libio/oldpclose.c:36: was created by popen(). Instead we rely on \_IO\_SYSCLOSE to call ./libio/pclose.c:33: was created by popen(). Instead we rely on \_IO\_SYSCLOSE to call ./libio/tst-popen1.c:20: puts ("first popen(\\"r\\") set FD\_CLOEXEC"); ./libio/tst-popen1.c:38: puts ("second popen(\\"r\\") did not set FD\_CLOEXEC"); ./stdio-common/xbug.c:63: if (!(input \= popen("/bin/cat", "r"))) ``` 跟进 `popen()`的实现:`_IO_new_popen()` => `_IO_new_proc_open()` 在 `IO_new_proc_open()` 里可以找到这里,实际上 popen 最终执行的就是这里的一个 spawn\_process 函数 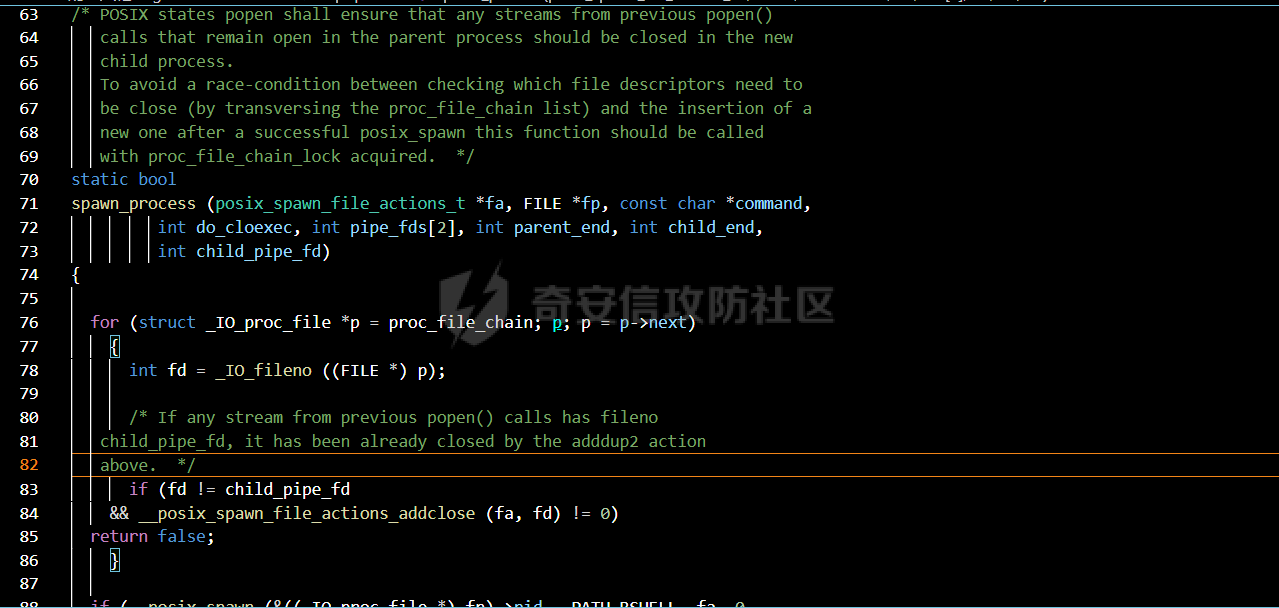 继续跟进,可以看得出这里实际上最终调用到的是 `__posix_spawn`,我们的命令最终在这里完成  也就是说,我们的 system 最终执行命令的方式为 sh -c "system中的系统命令",也就是 /bin/sh,这里要注意 /bin/sh 是一个软连接,在不同系统内指向的 shell 不同。 在 linux 系统下我们可以通过 strace 来观测进程操作: 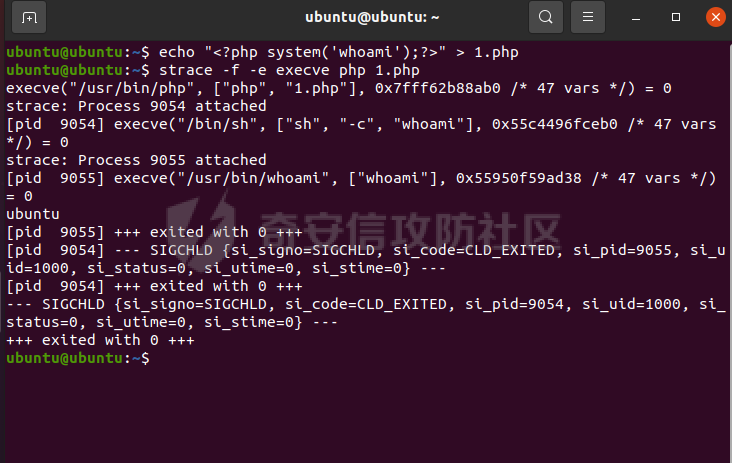 #### Java `Runtime.getRuntime().exec` 的调用学过 Java 的应该都很清楚,通过 exec 方法调用到 `ProcessBuilder` 类,进而调用 `ProcessImpl` ,然后进行进程操作。 和 PHP 不同的是,Java 默认情况下通过 `Runtime.getRuntime().exec` 执行命令时并没有调用 `popen` ,也没有给 `execve` 传入 `sh -c` ,而是直接创建进程,把参数传递至 `execve` ,我们仍然可以在 linux 下通过 starce 来观察进程的操作。 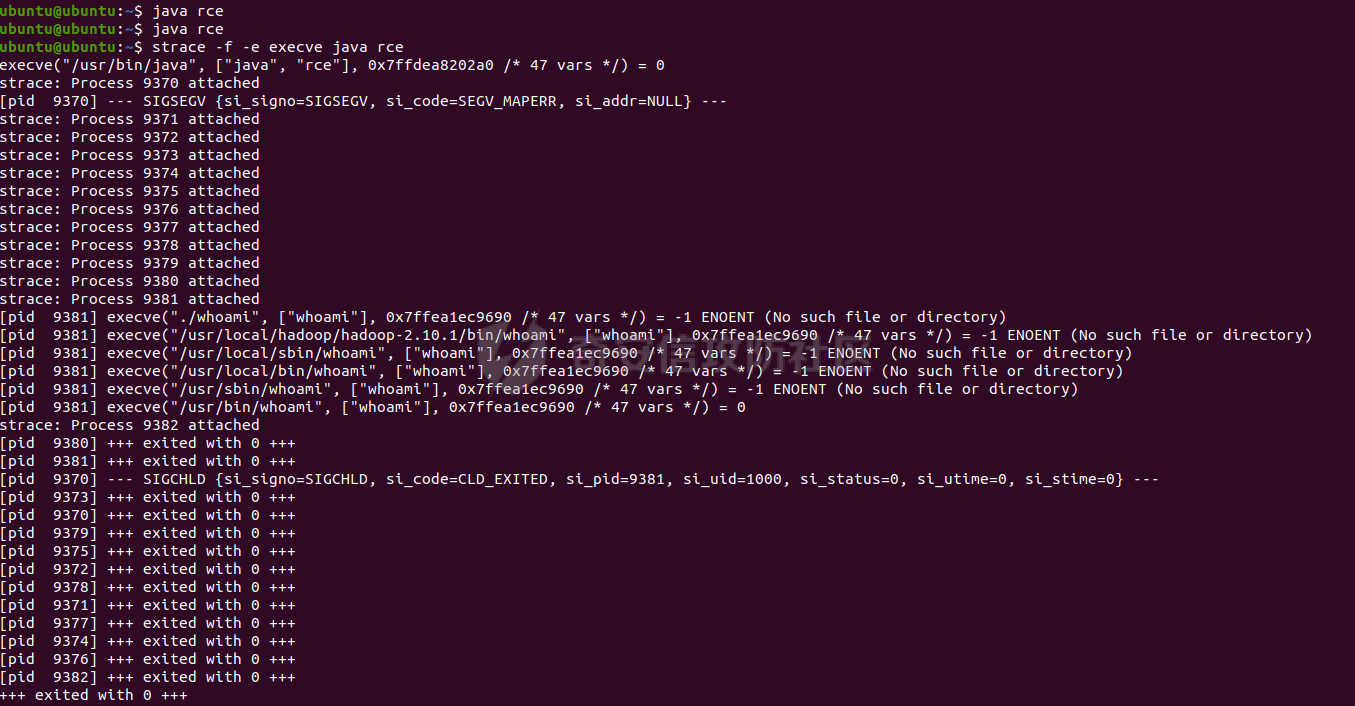 在 windwos 下也是直接进行了进程操作:  这里是运行的一瞬间直接新建了线程来完成命令,java.exe 下是没有像 PHP 一样调用 cmd.exe 的情况出现的。 #### python 以 system 为例,从 strace 的结果来看 python 的 system 和 php 的 system 类似,换成 os.popen 也是一样  但是 subprocess 中的方法就不是了 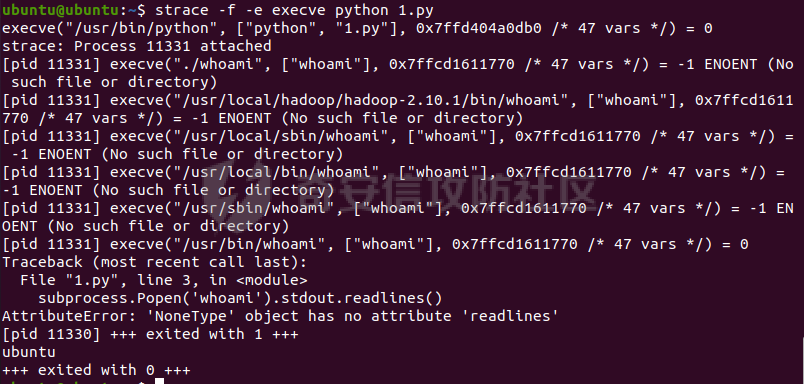 这里是 subprocess.Popen 的执行过程,这样就更像 Java 里的操作了。 可以发现,在第二类里 我们是没有办法直接调用我们一开始所说的 shell 的内置函数的,这里算是一个小 tips: 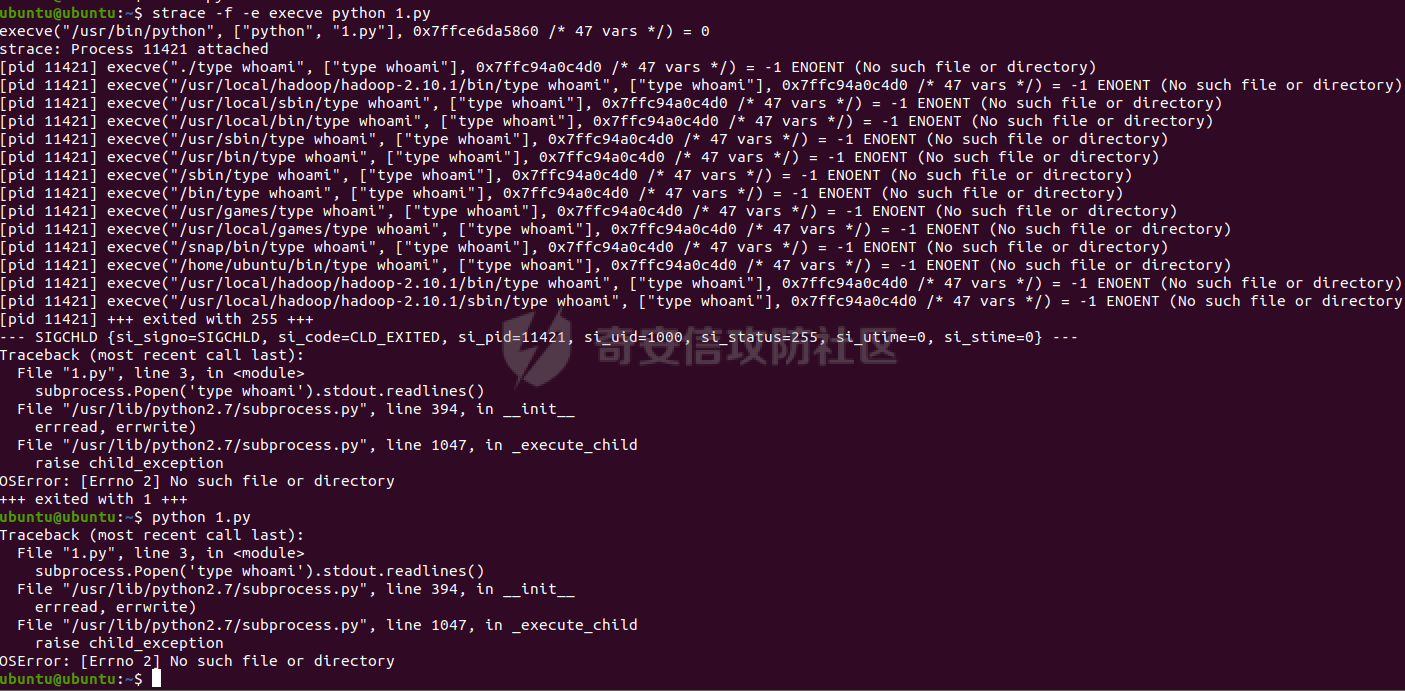 当然 Popen 的用法也有很多,比如我们可以设置 shell=True ,这样就是默认调用 /bin/sh 执行命令了。 #### NodeJs 可以使用 child\_process 模块执行系统命令,这个时候是操作进程 类似上面的 subprocess。 ### 小结 一类是 像 php 中的 system,python 中的 os.system 这样的,最终在底层调用的是操作系统的 shell ,将命令传入进而执行。 另一类就是 像 Java 、python 中的 subprocess 这样的,通过新建进程,直接去调用相应命令二进制文件的方法。 关于进程这一部分实际上是像进一步研究的,但是操作系统层面的知识储备实在是不够,可以考虑在学习一段时间域渗透、Windows 安全之后再回来看看。
发表于 2023-03-08 09:00:01
阅读 ( 10898 )
分类:
漏洞分析
0 推荐
收藏
0 条评论
sp4c1ous
11 篇文章
×
温馨提示
您当前没有「奇安信攻防社区」的账号,注册后可获取更多的使用权限。
×
温馨提示
您当前没有「奇安信攻防社区」的账号,注册后可获取更多的使用权限。
×
举报此文章
垃圾广告信息:
广告、推广、测试等内容
违规内容:
色情、暴力、血腥、敏感信息等内容
不友善内容:
人身攻击、挑衅辱骂、恶意行为
其他原因:
请补充说明
举报原因:
×
如果觉得我的文章对您有用,请随意打赏。你的支持将鼓励我继续创作!